
Continuing our series on Security Practices for Express APIs, we now explore how to implement rate limiting and throttling with TypeScript. These security mechanisms are crucial for protecting your API from abuse, such as Distributed Denial of Service (DDoS) attacks, brute force login attempts, and excessive traffic from malfunctioning clients.
By using TypeScript, we introduce type safety, improving code clarity and reducing runtime errors, making your API development experience smoother and more reliable.
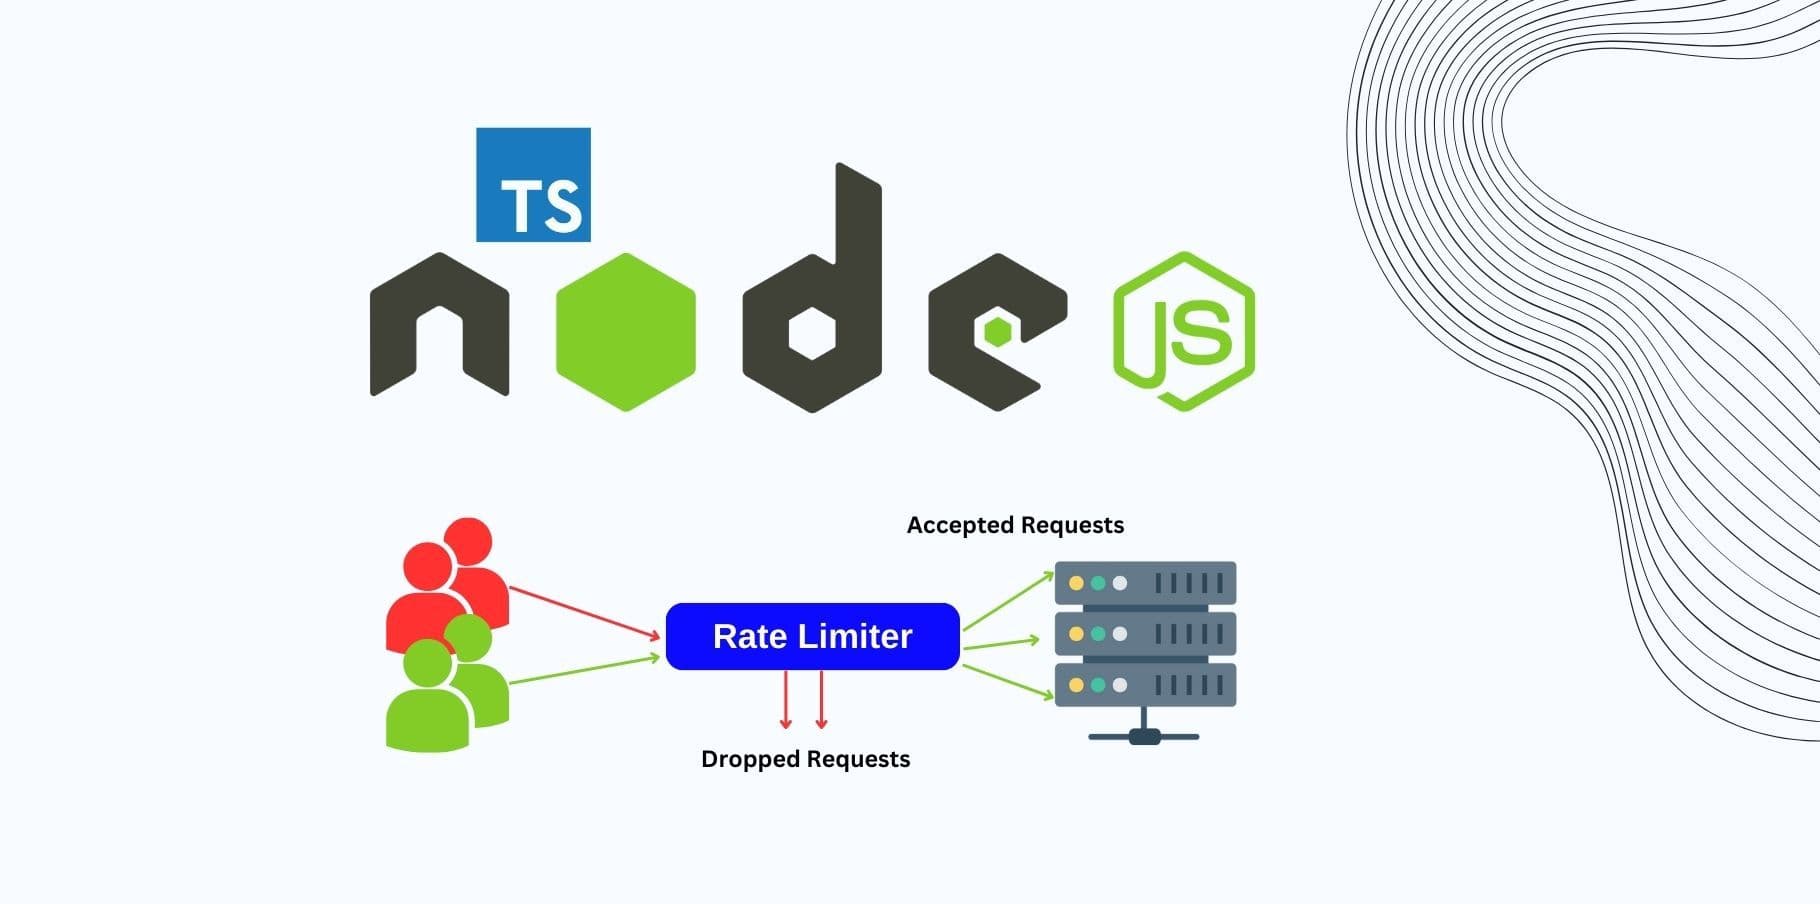
Why Rate Limiting and Throttling Are Important
APIs are frequently exposed to the internet, making them vulnerable to malicious traffic or unintentional abuse by legitimate users. Without rate limiting and throttling, a single client could:
- Overwhelm your server with requests (leading to downtime).
- Launch brute force attacks on sensitive endpoints (e.g., login or registration).
- Consume your API's resources unfairly, depriving others.
Rate limiting restricts how many requests a client can make within a given time window, while throttling controls the rate at which clients can make requests. Together, they protect your API from overload and misuse.
Step 1: Setting Up Express with TypeScript
To get started with TypeScript in an Express project, make sure you have your environment set up correctly.
Initialize TypeScript in your project:
npm init -y
npm install typescript --save-dev
npx tsc --init
Install required types and middleware:
npm install express @types/express express-rate-limit express-slow-down @types/express-rate-limit @types/express-slow-downBasic TypeScript Express Setup:
Create a basic Express server with TypeScript.
import express, { Request, Response } from 'express';

const app = express();

app.use(express.json());

app.get('/', (req: Request, res: Response) => {
  res.send('Welcome to the API');
});

const PORT = process.env.PORT || 3000;
app.listen(PORT, () => console.log(`Server running on port ${PORT}`));
Step 2: Implementing Rate Limiting in TypeScript
The express-rate-limit package helps limit the number of requests a client can make over a specified time window.
2.1 Install the rate limiting middleware
First, install the required package if not already installed:
npm install express-rate-limit @types/express-rate-limit2.2 Implement Basic Rate Limiting
In this example, we will limit each client to 100 requests per 15 minutes. Requests exceeding this limit will receive a 429 Too Many Requests response.
import rateLimit from 'express-rate-limit';

// Define the rate limiting middleware
const apiLimiter = rateLimit({
  windowMs: 15 * 60 * 1000, // 15 minutes
  max: 100, // Limit each IP to 100 requests per windowMs
  message: {
    status: 429,
    message: 'Too many requests from this IP, please try again after 15 minutes',
  },
  standardHeaders: true, // Return rate limit info in the `RateLimit-*` headers
  legacyHeaders: false, // Disable the `X-RateLimit-*` headers
});

app.use('/api/', apiLimiter);
Explanation:
- windowMs: The time window for counting requests (15 minutes).
- max: The maximum number of requests allowed in that window.
- message: Custom response message for clients exceeding the rate limit.
- standardHeaders: Sends rate limit info in the RateLimit-* headers.
- legacyHeaders: Disables deprecated headers (X-RateLimit-*).
This middleware applies rate limiting to all routes under /api/.
2.3 Stricter Limits for Sensitive Routes
For security-sensitive routes, such as login or registration endpoints, you may want stricter limits. For example, limiting login attempts to 5 requests per 10 minutes:
const loginLimiter = rateLimit({
  windowMs: 10 * 60 * 1000, // 10 minutes
  max: 5, // Limit each IP to 5 login attempts per windowMs
  message: {
    status: 429,
    message: 'Too many login attempts from this IP, please try again after 10 minutes',
  },
});

app.post('/api/login', loginLimiter, (req: Request, res: Response) => {
  // Handle login logic here
  res.send('Login endpoint');
});
This setup protects against brute force attacks by limiting the number of login attempts allowed within a 10-minute window.
Step 3: Implementing Throttling in TypeScript
Throttling differs from rate limiting in that it allows more requests but slows down responses when a client exceeds the limit. This helps smooth out request spikes.
3.1 Install the express-slow-down package
To handle throttling, we use the express-slow-down middleware.
npm install express-slow-down @types/express-slow-down3.2 Implement Basic Throttling
Here’s how to implement basic throttling that slows down responses if a client makes more than 50 requests in 15 minutes. Each additional request will be delayed by 500ms:
import slowDown from 'express-slow-down';

// Define the slow down middleware
const speedLimiter = slowDown({
  windowMs: 15 * 60 * 1000, // 15 minutes
  delayAfter: 50, // Allow 50 requests per 15 minutes, then start slowing down
  delayMs: 500, // Delay each request by 500ms after hitting the limit
});

// Apply the speed limiter to all /api/ routes
app.use('/api/', speedLimiter);
- delayAfter: Number of requests after which responses are delayed.
- delayMs: The delay (in milliseconds) added to each subsequent request after hitting the limit.
3.3 Throttling for Specific Routes
You can also apply custom throttling to specific routes, such as a registration endpoint where you'd want to slow down high-frequency requests:
const registerSpeedLimiter = slowDown({
  windowMs: 30 * 60 * 1000, // 30 minutes
  delayAfter: 10, // After 10 requests, delay responses
  delayMs: 1000, // Delay each request by 1000ms
});

app.post('/api/register', registerSpeedLimiter, (req: Request, res: Response) => {
  // Handle registration logic here
  res.send('Registration endpoint');
});
This ensures that the registration endpoint can handle a reasonable number of requests but slows down after exceeding the limit.
Step 4: Handling Edge Cases in TypeScript
4.1 Whitelisting Trusted Clients
You might want to exclude certain trusted clients (e.g., internal IPs or admin users) from rate limiting or throttling. Here's how to skip certain IP addresses:
const apiLimiter = rateLimit({
  windowMs: 15 * 60 * 1000,
  max: 100,
  skip: (req: Request, res: Response) => {
    const trustedIps = ['123.45.67.89']; // List of trusted IPs
    return trustedIps.includes(req.ip);
  },
});
4.2 Logging Rate Limit Events
To monitor and log requests that exceed rate limits or throttling, use the onLimitReached or onSlowDown hooks:
const apiLimiter = rateLimit({
  windowMs: 15 * 60 * 1000,
  max: 100,
  onLimitReached: (req: Request, res: Response, options) => {
    console.warn(`Rate limit reached for IP: ${req.ip}`);
  },
});
Logging events helps you track clients that frequently exceed the rate limits and might require further action, such as blacklisting or monitoring.
Step 5: Updating tsconfig.json for Node.js
To ensure TypeScript compiles correctly for Node.js, update your tsconfig.json file with the following configuration:
{
  "compilerOptions": {
    "target": "ES2020",
    "module": "commonjs",
    "strict": true,
    "esModuleInterop": true,
    "skipLibCheck": true,
    "forceConsistentCasingInFileNames": true,
    "outDir": "./dist"
  },
  "include": ["src/**/*"],
  "exclude": ["node_modules"]
}
Compile the TypeScript files using:
npx tscAnd run the server:
node dist/index.jsConclusion
In this updated post, we explored how to integrate rate limiting and throttling into your Express API using TypeScript. Here's a quick recap of what we covered:
Rate limiting with express-rate-limit to control the number of requests from clients.
Throttling with express-slow-down to slow down responses after a client exceeds request limits.
Best practices like whitelisting trusted clients and logging limit events for improved monitoring.
How TypeScript enhances the development experience with better type safety, ensuring fewer errors and